Can I use Google Forms for Voting in a school election? Most districts nowadays have G-Suite for education which can make this process fairly easy as you will see below. If your district does not use G-Suite we recommend a program like Voting 4 Schools which is secure and you don’t have to worry about violating FERPA ( Family Educational Rights and Privacy Act ) Compliance How do I use Google Forms to create a school election? Below are the instructions to set up an election, but be aware, students are finding ways of “hacking” the votes as there are some major limitations that we will point out below. Follow these steps to create a Google Election: 1. Go to Google Drive 2. On the top left corner, click on the “New” button.
3. Then you click “More.” Click on the “Google Forms” and then click “Blank Form.”
4. The screen that opens up will be “Untitled form.” This is where you will start creating your election.
5. Name your election. I will name mine “Vote for your Prom King and Queen.”
6. Click on the top left “Untitled form” and your title you just typed in will automatically be inputted.
7. You can then fill in your “Form description.”
8. Now you can start inputting your candidates.
9. Under “Question” title what they are voting for. I made mine “Vote for 1 Prom King.” On the right side of your question, you can choose “multiple choice” for your election. Under “Option 1” put your 1st candidate in and click return. Add all your candidates. Also on the bottom right, turn the “Required” switch on. Here is the first limitation you will find with Google. If you want to do nominations and say all seniors are eligible, there is no way to upload all of your seniors as candidates. Plan on spending half the day entering them by hand. As an alternative program like Voting 4 Schools offer a simple solution where you can upload a list of eligible candidates or since grade level is uploaded you can check all 12th graders and they are all instantly added as candidates.
10. If you would like to add a photo of your candidate, click on add image. This is on the right side of the candidate’s name. Make sure your cursor is on the candidate’s name.
11. The image upload screen will pop open and this is where you will input your candidate’s photo. You can upload from any of these ways: upload from your computer, from a camera, by URL, in your photos, from Google Drive, or search for a Google image. I typically have the photos saved on my computer so I clicked on “Upload” and then “Browse.” You can also drag your photo in.
12. Skip this step if you know how to upload your photo. A new window pops open and you select your photo. Click on your photo you want to use then click “Open.” Now your candidate will have their photo under their name.
Repeats steps 1-12 for Prom Queen. VIDEO: If you want to add a video of a candidate, you can add it here. Videos will all be under the candidates:
Now you have finished your Voting Form. How can I send this Google Election to my students?
How to send Google Elections to Students:
1. Click on the settings widget.
2. Your setting screen will pop up. Under the general tab you want to check Collect email addresses and under the requires login check both options (Restrict users in your organization and Limit to 1 response). *** This is where using Google as an election/voting tool falls short ***
When sending this out to students, you are sending a link via email or putting a link on your website. The setting Restrict users in your organization only allows a user with your common domain name to fill out the form. So if your district is name@abc.k12.us then anyone with an abc.k12.us email address can fill out the form. When you create an election for sophomores only, they can forward that email to anyone in the school or even across the district who can then fill out the form/vote in your election. Read More…
3. This is optional. You can then click the top Presentation tab and send a personalized confirmation message. I typed in “Thank you for voting for Prom King & Queen.” Don’t forget to Save everything you just did.
4. Now you will go back to your forms screen. You can see that this form is only for your organization.
And you can see what your voting election will look like when you click on the “eye” on the top left side.
5. Here’s my preview of what my students will see:
6. The last thing is getting a link to send this out.
On the top left corner, there is a “send” button. Press Send.
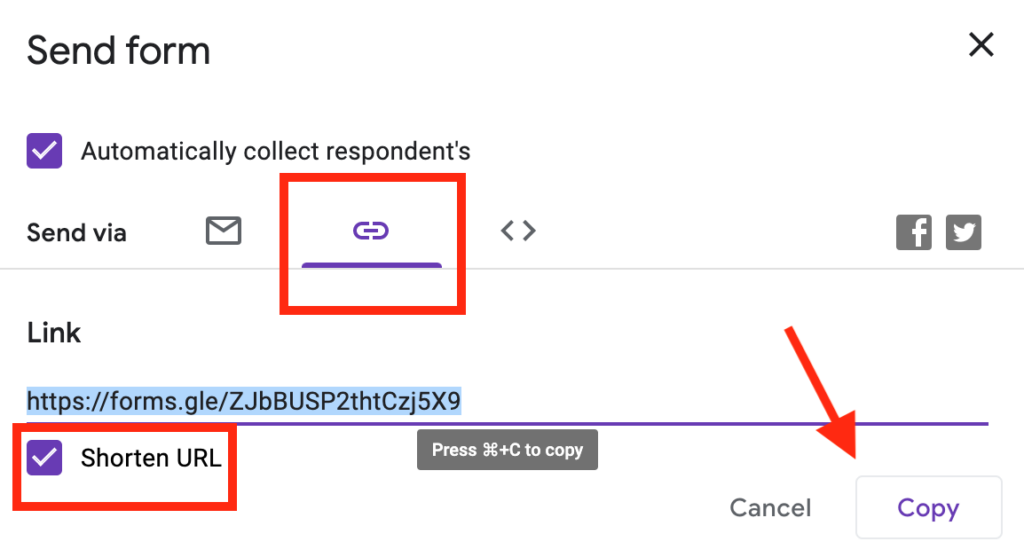
7. Here is your “Send form.” You can click on the URL button and click the shorten URL. Copy this link and share it with the students that should be voting. You can also click on the email button and type in all the emails.


Now your students have voted and you want to see who has won your election. How do you find your results?
Follow these steps for your results:
Click on the Responses tab. You can see from my election that 6 students have responded. Also, you see the emails of the students who have voted. Scroll down further and you can see the results from the election.
Now you can get started on your own election.
**This is a free way to create an election form but beware that this doesn’t prevent any fraudulent voting.**
![]()
An education company designed and run by former educators doing our best to support other educators.